

Guidelines for Installing Outdoor Invisible Grills for Enhanced Safety and Aesthetics
- Ypl Invisible grill
- Aug 7, 2025
- 4 min read


Outdoor spaces are vital for improving the beauty and usability of your home. Homeowners frequently prioritize safety, especially in properties with balconies or decks. This is where invisible grills shine as an effective solution. They enhance safety while also adding to the visual appeal of your space.
Invisible grills provide a modern alternative to traditional safety barriers. They offer unobstructed views while preventing falls, particularly in high-rise buildings. This guide outlines essential steps for installing outdoor invisible grills, ensuring a safe and visually pleasing environment.
Understanding Invisible Grills
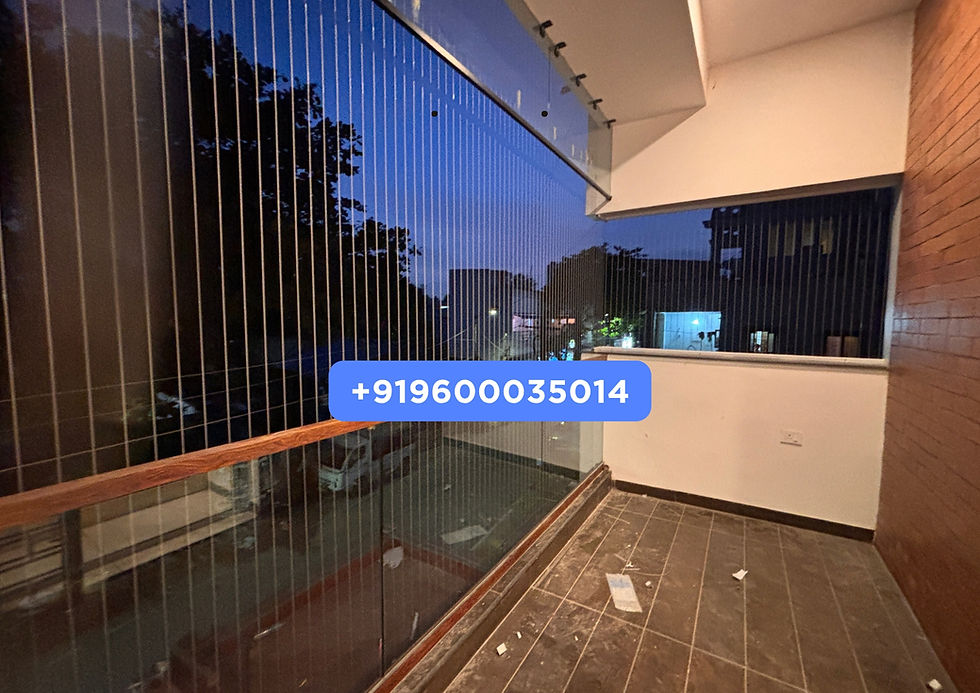
Invisible grills consist of high-strength stainless steel cables that are intricately woven together, making them robust yet nearly invisible. This design creates a sturdy barrier without sacrificing style. Their transparent quality allows natural light to filter through, preserving the beauty of outdoor views.
For instance, homes with balconies overlooking scenic landscapes can benefit immensely. Invisible grills keep children and pets safe while maintaining an open feel. Statistics show that homes equipped with stainless steel invisible grills reduce accidental falls by up to 70%. This percentage highlights their effectiveness, particularly in urban high-rises or family residences.
Preparing for Installation
Before you begin installation, proper preparation is key. Here’s a quick checklist to guide you:
Measure the Area: Calculate the dimensions of the space for the invisible grill. This ensures you purchase the right amount of materials.
Select Quality Materials: Opt for high-quality stainless steel cables and durable fixtures. This choice not only guarantees longevity but also enhances your home’s aesthetic appeal.
Wear Safety Gear: Use protective gear like gloves and goggles during installation to avoid injuries.
Having a clear plan and checklist will streamline your installation, paving the way for positive results.
Tools Required for Installation
Gathering the right tools makes installation easier. Here’s a list of must-have tools:
Measuring Tape: Essential for precise measurements.
Drill: Necessary for creating holes for anchors.
Screwdriver: Needed to secure the fittings in place.
Level: To check that your installation is even and straight.
Cable Cutter: For trimming the stainless steel cables to the right lengths.
Having these tools available will contribute to a smooth installation process, ensuring everything is assembled correctly.
Step-by-Step Installation Process
Follow these steps for efficient installation of your outdoor invisible grills:
Step 1: Mark the Installation Points
Using your measurements, mark the anchoring locations for the stainless steel cables. Ensure these points are evenly spaced for visual balance.
Step 2: Drill Holes for Anchors
Drill holes at the marked points. Be sure the holes are deep enough for secure anchor placement.
Step 3: Install the Anchors
Insert the anchors into the drilled holes, ensuring they are flush with the wall or floor surface to avoid hazards.
Step 4: Cut and Attach Cables
Measure and cut the stainless steel cables based on your earlier measurements. Attach one end of each cable to the installed anchors, securing them with the right fittings.
Step 5: Tension the Cables
After securing all cables, tension them properly. This vital step ensures the grill’s stability and prevents sagging, which could compromise safety. A tight cable enhances durability and effectiveness.
Step 6: Perform Safety Checks
Once installation is complete, conduct thorough checks by gently pulling on the cables. Ensure they are taut and stable to confirm they are securely installed.
Maintenance Tips for Longevity
Invisible grills are built to last, but regular maintenance can extend their lifespan. Here are a few simple tips:
Regular Cleaning: Clean the cables with a soft cloth and mild soap to eliminate dirt and pollutants. This maintains their aesthetic appeal.
Inspect for Damage: Routinely check for signs of wear or corrosion. Address any issues immediately to prevent accidents.
Re-tension the Cables: Cables may loosen over time. Periodically check and adjust the tension to ensure continued safety.
By adhering to these maintenance guidelines, you can keep your invisible grills functional and looking great for many years.
Benefits Beyond Safety
Invisible grills provide more than safety; they also enhance your space in various ways:
Unobstructed Views: They offer clear visibility, making outdoor areas more enjoyable, whether you're sipping coffee on the balcony or watching the sunset.
Minimalistic Design: The sleek appearance complements modern architecture and adds elegance to your home.
Versatile Applications: These grills can be installed in various outdoor locations, such as balconies, patios, and terraces, making them an adaptable choice for every home.
Investing in invisible grills not only prioritizes safety but also elevates the aesthetic quality of your outdoor spaces.
Final Thoughts
Installing outdoor invisible grills blends safety with style, ensuring your home looks beautiful and remains secure. By following the provided guidelines, you can successfully install these grills in your outdoor areas, allowing for peace of mind alongside aesthetic benefits.
Whether you're looking to safeguard family members or enhance your home's design, invisible grills are an excellent choice. With the right materials and techniques, your outdoor spaces can become a stunning and secure haven for enjoying memorable moments.


Comments